Email: iPhone
|
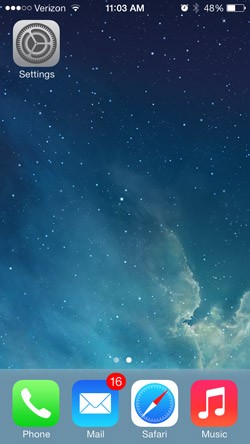
Step 1
From the Dashboard, click Settings.
|
 |
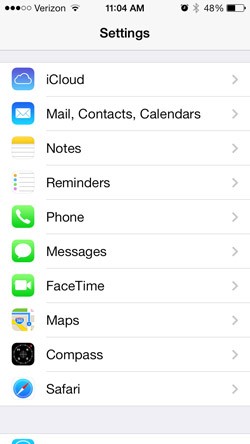
Step 2
Under Settings, select Mail, Contacts, Calendars.
|
 |
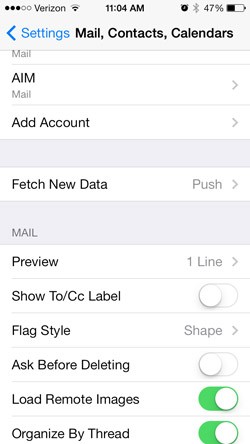
Step 3
Select Add Account...
|
 |
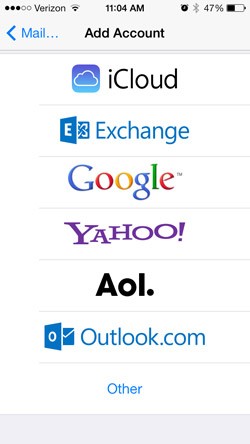
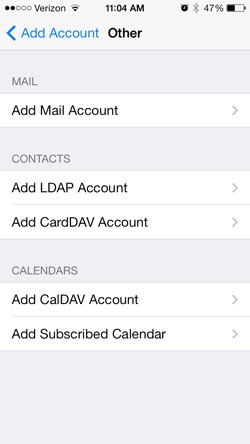
Step 4
Select Other as the type of account.
|
 |
Step 5
Click Add Mail Account:
|
 |
Step 6
Complete the fields:
- Name: Enter your name to be seen by others.
- Email (or Address): Enter in your email address.
- Password: Enter in your password that was created for this email account.
- Description: Enter in a description for this email account. i.e: Work Email.
|
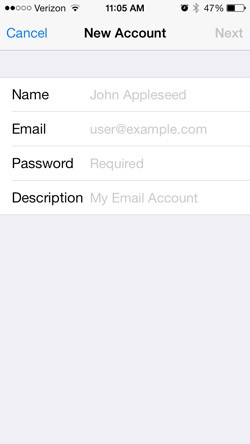 |
Step 7
Click Next
|
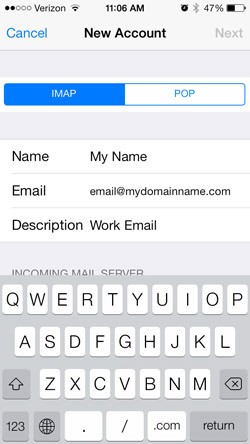
Step 8
Click IMAP and verify the information (name, email and description) is correct.
|
 |
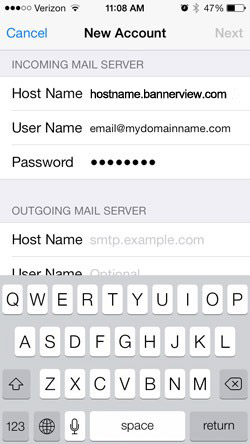
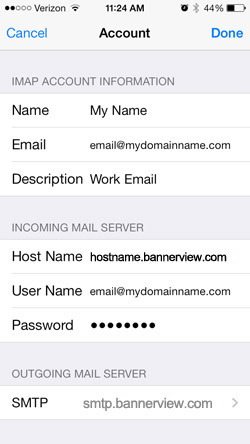
Step 9: Incoming Mail Server
Scroll down and enter in the Incoming Mail Server Information:
- Host Name: Enter in planname.bannerview.com
(Replace 'planname' with your hosting plan name, which is usually the same as your BannerView.com hosting account username. If you're not sure, your plan name can be found in the Welcome email you received when you signed up for services, or by logging into your BannerView.com hosting account and scrolling to the bottom of the Account Dashboard. Confused? Watch this Video).
- User Name: Enter your full email address including the domain name after the @ sign. This is case sensitive and should be all lower case letters.
- Password: Enter in your password that was created for this email account.
|
 |
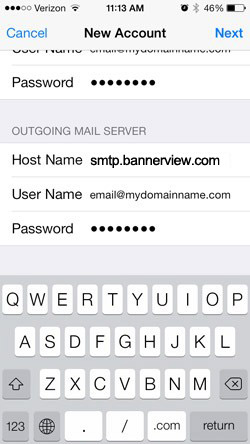
Step 10: Outgoing Mail Server
Scroll down and enter the Outgoing Mail Server information:
- Host Name: Enter in smtp.bannerview.com
- User Name: Enter your full email address including the domain name after the @ sign. This is case sensitive and should be all lower case letters.
- Password: Enter in your password that was created for this email account.
|
 |
Step 11
Click Next
|
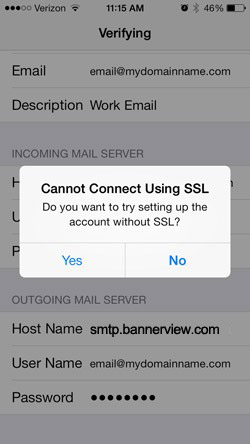
Step 12
If you see a message that says "Cannot Connect Using SSL", click Yes when asked to setup the account without SSL.
|
 |
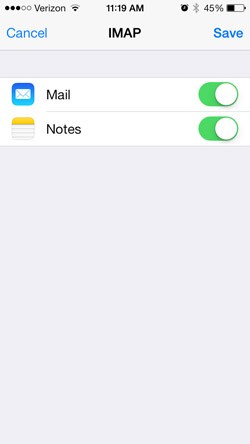
Step 13
Set Mail to ON. Notes is optional. This will add your notes from your iPhone as an email folder.
|
 |
Step 14: Optional Account Options
Click Save
|
TroubleShooting: If you receive an error when trying to send or retrieve your messages, try the following fixes:
|
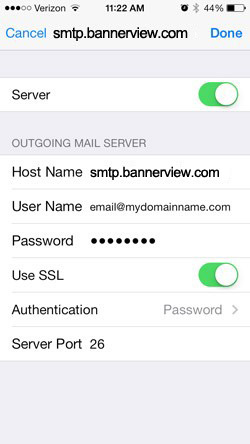
If you are not able to send messages, change the following:
- Change Outgoing Server Port to 26
- Turn Outgoing Server SSL ON
- Check to make sure the Outgoing Mail Server is turned ON
Step 1: From your dashboard, click on Settings
Step 2: Click on Mail, Contacts, Calendars
Step 3: Click on the name of the email account you setup
Step 4: Click on Account
Step 5: Scroll down to SMTP located under Outgoing Mail Server
Step 6: Click on the server name (smtp.bannerview.com) under Primary Server
Step 7: Check the settings listed above
|
 |
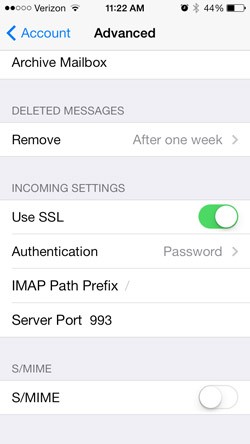
If you are not receiving emails, check the following settings:
- Incoming Server SSL is ON
- Authentication for Incoming Mail Server is set to Password
- Incoming Mail Server is set to 993
Step 1: From your dashboard, click on Settings
Step 2: Click on Mail, Contacts, Calendars
Step 3: Click on the name of the email account you setup
Step 4: Click on Account
Step 5: Click on Advanced
Step 6: Check the settings listed above
|
 |
|
If your error says your username or password are incorrect:
Username under Incoming Mail and Outgoing Mail MUST be your full your email address and must be all lower case letters.
Retype in your password under Incoming Mail Server and under Outgoing Mail Server
|
 |