How One Video Can Fuel Your Content Marketing
Time travel should be a tool in our marketing bag of tricks. Unfortunately, the flux capacitor has yet to be invented. Until that time, I’d like to suggest a tactic for those hard-pressed to arrange time to create for their marketing program.
Much of marketing is digital. By that I mean, the raw materials have been created by computer. Even in cases where a physical item like a mailer or poster is created, the files originated on a disk drive. A huge benefit of the digital revolution has been the ease with which we can save, manipulate, copy and share these files. Because of this flexibility, a lot of digital marketing uses a mix of multimedia, e.g. graphic design, animation, audio and video.
Of course, the time to produce an elaborate multimedia project requires more hours than any of us can contribute. Disney, Pixar, Lucas Arts; they have the time. We do not, but we DO have resources. With those resources, I suggest this…
…You only produce one video a month.
Now, before you give me the evil eye, let me prove the validity of that statement. First, let’s look at some stats.
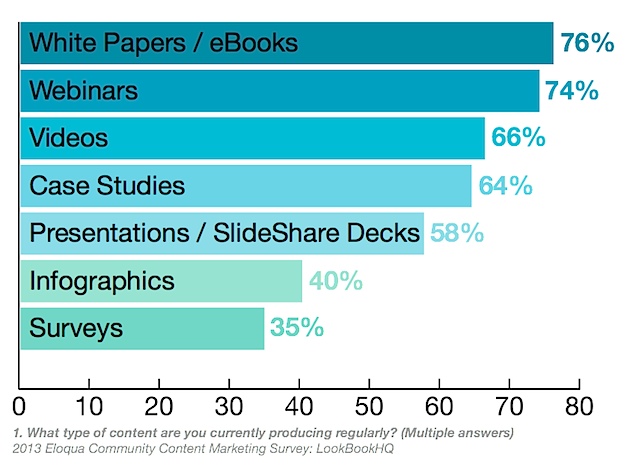
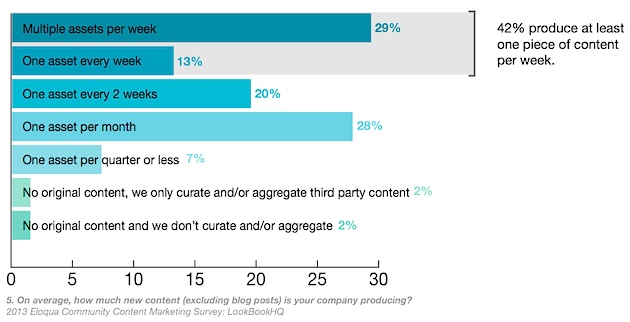
Less than half of content marketers (42%) produce one or more content assets (not including blog posts) per week, according to a recent report from LookBookHQ and Oracle Eloqua.
However, most content marketers (62%) produce at least one asset every two weeks, and 29% create multiple pieces per week. That’s still a pretty low percentage. As a marketer, my typical week could go from website updates and analysis, to graphic or multimedia design, to social media, to SEO to etc. You see where I’m going with this. We have A LOT on our plates. It’s no wonder why production numbers are low.
Now, back to my suggestion. Here is my reasoning…
…With one video, you can feed your marketing program multiple times.
How? To elaborate, let’s look at the elements that make up video. You have:
- The original video
- The transcript
- The images
- The animation
- The audio
From those raw materials you can:
- Create shorter video clips
- Blog article(s) from the transcript
- Collateral online & offline materials and social media posts from the images
- Animated gifs from the video or any animation from the video
- Podcasts, CDs from the audio
- and more
So you can see, that from one video, you can fill your content publishing calendar for most of the month. With that in mind, let me take you through my abbreviated process that produced our videos.
During the video editing process, raw camcorder footage, images, animation and audio are mixed to create a visual story. The tools used vary from platform to platform, with each having benefits the others don’t. Going forward, I’ll refer mostly to the Mac platform, as that is what we use, but will occasionally mention tools on the other platforms where appropriate. I will also preface this discussion by saying that the more creative you are with your project, the more supplemental materials that project will produce.
Let’s begin with project parameters. Using a combination of video, images, animation and audio, I usually try to create a video no longer than 2 minutes long. With video, I usually start with inspiration. Cinematography is an interest of mine, so I have a ton of visual memories stored away upon which to draw. I’ll then storyboard the idea, sketching potential scenes and actions. There are plenty of approaches for storyboarding. You can go in-depth with scene shots, descriptions, camera angle, etc. or, simple with stick figures and dialog. It’s up to you and your level of creativity.
Here’s a beginner’s tutorial on storyboarding
HINT: Storyboarding can be done easily by just taking a sheet of paper and drawing 6-8 similarly sized squares upon it with each square representing a scene.
Next, you’ll need to begin writing a script. As you’ll want to use the script as a transcript or accompanying blog article, try to be as descriptive as possible. Though the technology has evolved to where the search engine can index spoken word, sometimes things get “lost in translation.” If the video is more interview style or unscripted, I recommend finding someone that’s good at transcribing. You can also consider investing in transcription software.
Below are three transcription programs that can help:
www.inqscribe.com
www.quikscribe.com
www.nuance.com/dragon
My advice regarding both storyboard and script is to be open to change. Things sometimes need to be edited for time. Sometimes, a scene is not feasible to do given your resources. I try to “guerrilla” produce my videos, i.e. use free resources as much as possible. I’ve encountered roadblocks where my original idea had to be modified because the stock footage or soundtrack didn’t exist, or was cost prohibitive. I will say you do get what you pay (or not) pay for.
Next, let’s discuss the part where most people get hung up; the audio/visuals. Yes, these programs and the production equipment do require some advanced skills, these programs and equipment have gotten much more user-friendly and will continue to do so (especially if you use a Mac).
Although I won’t go into what equipment to use, I will recommend investing in professional lighting and microphones. Nothing says “amateur” like muffled audio and blurry video. I’ll also recommend designating an area where you can keep your equipment setup, as setups usually take up most of your time.
For equipment purchases and reviews, I recommend the following sites:
reviews.cnet.com/camcorders
www.bhphotovideo.com
www.videomaker.com
Videomaker is also a good place to start for tips and tricks on shooting video for your projects.
I’ve used everything from a simple point and shoot camera to an iPad to HD camcorders. Video quality depends on equipment used and environment. The better you capture footage, the less editing you’ll have to do later.
Once I capture the raw video footage, I consider still images that might be complementary. Not all projects will require stock images, but you may want to create your own imagery. Video frames can be exported for editing or use in an animated gif (hugely popular on Google+).
To experiment with a photo editor, check out www.pixlr.com.
If you’re interested in incorporating simple animation, I’ll recommend using Keynote, a PowerPoint type program for Mac. It lets you select from and apply a large selection of actions to illustrated elements. In effect, it creates the animation for you. Then, you can export the animation as a .mov video clip and import it into your video project.
To increase your stock selection options, many sites offer subscriptions to download so many images/video clips/music&FX a month.
You can choose from scenic backgrounds for green screen shoots:
To illustrations used in animations:
Two sites to check out for stock footage:
www.thinkstockphotos.com
www.sxc.hu (free with account)
Lastly, I add the soundtrack. The soundtrack will also include any FX or voice over that you may want to record. As a musician, I tend to place more importance on a soundtrack than others. Music and imagery combined can be a powerful combination, so I keep that in mind with the tools I use. ProTools reigns as the tool the music industry uses, but for our needs, I use either GarageBand (Mac) or Acid Studio (PC).
You’ll need samples to start with (unless you’re a musician like me and record your own). Samples are loops that you can mix and match to create an original soundtrack. Your other option is to download full soundtracks and FX. YouTube has begun offering free soundtracks for use as well, available here.
For those of you more adventurous, here are 4 sites offering professional loop samples:
www.looperman.com
www.bigfishaudio.com
www.primeloops.com
www.pond5.com (also offers video clips & images)
Now that I’ve introduced a couple of projects on which I recently worked, I’ll say that each offered their own challenges. Yet, both of the two previous projects took no more than three days to complete. Once you’re comfortable with the editing program, the workflow becomes less challenging.
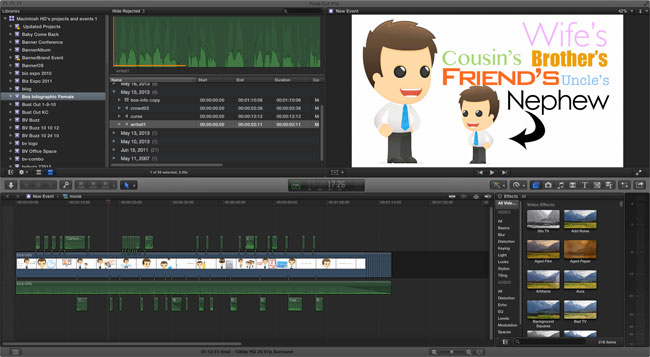
I’ve used a number of video editors to produce videos. There’s Adobe Premiere for the PC and Final Cut or iMovie for the Mac. All three operate similarly, in a non-linear, non-destructive way. The interface is drag & drop capable and arranges the image, audio and video elements into layered tracks, as illustrated below:
To see how non-linear editing works, below is an intro to Final Cut:
Though video is still CPU intensive, the move to online video editors is getting a big push with YouTube. You can find their free online video editor here.
Though I didn’t discuss mobile options, tablets and smartphones do offer a streamlined opportunity to accomplish what you can on the desktop. Apps like Instagram, Vine and YouTube can contribute materials, though YouTube is the only one that offers an in-app editor.
Read some interesting stats on Instagram and Vine
I will say that there are some great add-ons for the iPad that would greatly decrease the time to shoot and edit video. The Makayama Movie Mount below is an excellent example:
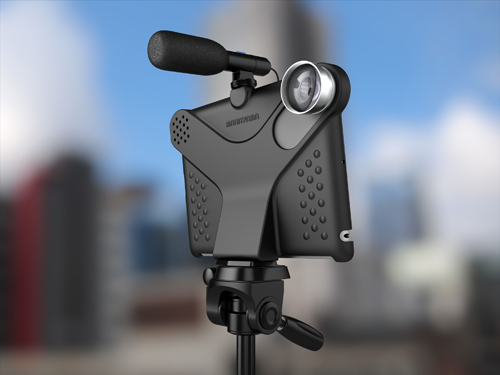
As a final note, if you have the budget, a professional video production studio will almost guarantee you a quality finished product. If the money isn’t available, investigate the option of DIY. It will take time to create a smooth production flow. However, once your workflow is developed, your marketing program will never be short of media.
How’s that for freeing up your time?
|
|
You can now get a professionally designed website for free! Check out the free website offer and get your website powered by BannerOS. BannerOS is free to try for 30 days.
Post a Comment
Subscribe to the BV Buzz
Catch the buzz for biz online with in-depth articles about social media, search optimization, content publishing & other resources that help you successfully run your business online.
Subscribe and get a copy of our FREE eBook "SEO on the Go"
Popular Articles
BannerView Press Publishes New Guide Titled Help Wanted: Women to Play College Basketball
Seminar Success: From The Back Row
Build Brand Awareness Via Youth Sports
Phil Frost Brings Marketing ROI to Main Street
Before You Build or Pay Someone to Build Your Website, Read This First
Categories
Join over
50,000 subscribers
that get the buzz for business online
Subscribe and get a copy of our FREE eBook "SEO on the Go"
Download
 Whitepapers, Infographics, & Quick Guides
What Email Campaign Schedules Generate the Most ROI?
Which Content Marketing Strategies Get the Best ROI?
Which Social Media Marketing Strategies Work Best?
Benefits of a Fully Functional & Optimized Website
About our software development company
"Your business. Energized!" BannerView.com is the developer of BannerOS, a premier website analytics and content management software that powers businesses all across the Internet. Get a website built or make your own with our website builder; two great ways to get a website powered by BannerOS.


